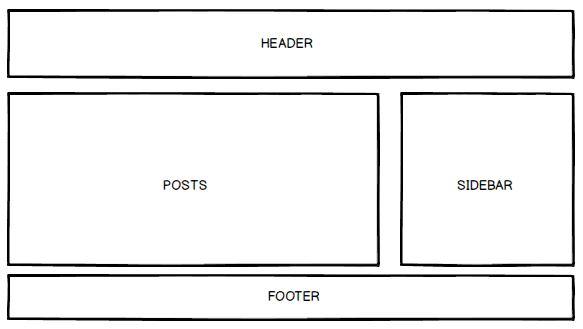
| How To Add New Widget/Gadget Section In Blogger Layout |
| في التطبيق هذا تجده بقالب التنظيف بس تحفظ يطلع كود رسمي |
| الكود راس القائمه <b:section class='header' id='header' maxwidgets='1' showaddelement='yes'> <b:widget id='Header1' locked='true' title='' type='Header' /> </b:section> نفس الشي <b:section class='Header' id='Header' showaddelement='yes'> <b:widget id='Header1' locked='false' title='(1)' type='Header'/> </b:section> |
| اضافه اداه بتعديل طوالي |
| <b:section class='sidebar' id='3' showaddelement='yes'/> |
| تعليمات فقط |
| خانة (id) :قم بوضع اي اسم تريد بشرط أن يكون
بالأنجليزية,او حتى أرقام وحروف خانة (class) : يتم وضع فيها اسماء الفئات الشائعة مثل "navbar" و "header" و "main" و "sidebar" و "footer" او وضع اي اسم تريد خانة (maxwidgets) : قم بوضع الحد الأدنى للأدوات التي تريد أضافتها داخل القسم.اذا لم تحدد,فلن يكون هناك حد للأدوات التي سوف يتم عرضها داخل القسم خانة (showaddelement) : اتركها كما هي |
| هذي خانه المقالات main |
| <b:section class='main' id='main' showaddelement='yes'> |
| توضيح للى يقول تنظيف القالب × هو اكواد فاضيه لنشغيل من جديد ونتابع التطبيق امسح اللى بقالبك وضع هذا |
| <?xml version="1.0" encoding="UTF-8" ?> <!DOCTYPE html> <html b:css='false' b:defaultwidgetversion='2' b:js='true' b:layoutsVersion='3' b:responsive='true' b:templateUrl='vegeclub.xml' b:templateVersion='1.0.0' expr:dir='data:blog.languageDirection' expr:lang='data:blog.locale.language' xmlns='http://www.w3.org/1999/xhtml' xmlns:b='http://www.google.com/2005/gml/b' xmlns:data='http://www.google.com/2005/gml/data' xmlns:expr='http://www.google.com/2005/gml/expr'> <head> <b:skin><![CDATA[ ----------------------------------------------- قالب تنظيف sfehthayef.blogspot.com 2025 ----------------------------------------------- ]]></b:skin> </head> <body> <b:section class='main' id='main' showaddelement='yes'> <b:widget id="Blog1" locked="true" type="Blog" /> </b:section> </body> </html> |
| يمكنك وضع الكود وحذف فقط |
| <b:section class='main' id='main'
showaddelement='yes'> <b:widget id="Blog1" locked="true" type="Blog" /> |
| راح تجد القالب فاضي وهنا تقدر تصمم بمزاجك " بس له طرق اخره ونتابع بعض الصور |
 |
 |
 |
 |
 |
| Come creare tre colonne nel footer di Blogger كيفية إنشاء ثلاثة أعمدة |
| البحث عن </body> تحته <div id='footer-widgets-container'> <div id='footer-widgets-containerback'> <div class='clearfix' id='footer-widgets'> <div class='footer-widget-box'> <ul class='widget-container'> <li> <b:section class='footersec' id='footersec1' showaddelement='yes'> <b:widget id='HTML15' locked='false' title='' type='HTML'> <b:includable id='main'> <!-- only display title if it's non-empty --> <b:if cond='data:title != ""'> <h2 class='title'><data:title/></h2> </b:if> <div class='widget-content'> <data:content/> </div> <b:include name='quickedit'/> </b:includable> </b:widget> </b:section> </li> </ul> </div> <div class='footer-widget-box'> <ul class='widget-container'> <li> <b:section class='footersec' id='footersec2' showaddelement='yes'> <b:widget id='HTML14' locked='false' title='Gallery' type='HTML'> <b:includable id='main'> <!-- only display title if it's non-empty --> <b:if cond='data:title != ""'> <h2 class='title'><data:title/></h2> </b:if> <div class='widget-content'> <data:content/> </div> <b:include name='quickedit'/> </b:includable> </b:widget> </b:section> </li> </ul> </div> <div class='footer-widget-box footer-widget-box-last'> <ul class='widget-container'> <li> <b:section class='footersec' id='footersec3' showaddelement='yes'> <b:widget id='HTML13' locked='false' title='About' type='HTML'> <b:includable id='main'> <!-- only display title if it's non-empty --> <b:if cond='data:title != ""'> <h2 class='title'><data:title/></h2> </b:if> <div class='widget-content'> <data:content/> </div> <b:include name='quickedit'/> </b:includable> </b:widget> </b:section> </li> </ul> </div> </div> </div></div> <div style='clear:both;'/> البحث عن ]]></b:skin> فوقه #footer-widgets { padding: 20px 0 0 0; } .footer-widget-box { width: 300px; float: left; margin-left: 15px; } .footer-widget-box-last { } #footer-widgets .widget-container { color: #374142; } #footer-widgets h2 { font-family: inherit; text-shadow: none; font-size: 16px; color: #fff; text-transform: uppercase; font-weight: 700; border-bottom: 4px solid #444444; padding-bottom: 10px; } #footer-widgets .widget ul { list-style-type: none; list-style: none; margin: 0px; padding: 0px; } #footer-widgets .widget ul li { padding: 0 0 9px 0; margin: 0 0 8px 0; } #footer-widgets-containerback { width: 980px; margin: auto; } #footer-widgets-container { background: #484848; border-top: 10px solid #66b381; } .footersec { color: #A1A6AF; font-size: 13px; line-height: 18px; } .footersec .widget { margin-bottom: 20px; } #footer-widgets-container { background: #484848; border-top: 10px solid #66b381; float: left; width: 100%; } .footersec ul { } .footersec ul li { } ملاحظه هنا يمكنك تضيف ما تحب وتعدل الالوان او مسحها ليتناسب معي قالبك |
 |
| كما بالصوره جربه xml-Yel1 ضلع واحد |
 |
| اضلع طواليه فوق |
| البحث عن <body> </body> كما يناسبك : حطيته تحت راح يطلع فوق واذا حطيته فوق راح يطلع بالاسفل <div style='clear: both;'/> <b:section class='cnsec' id='cnsec' maxwidgets='1' showaddelement='yes'/> <div style='clear: both;'/> التغير اذا حبيت تكرر فوق تحت اي مكان class 1 يعني مثلا <div style='clear: both;'/> <b:section class='cnsec1' id='cnsec1' maxwidgets='2' showaddelement='yes'/> <div style='clear: both;'/> وهذا الاستايل البحث عن ]]></b:skin> فوقه #cnsec {width:100%; display:block; margin:10px 5px;} #cnsec h2 {display:none;} عند التكرار تغير هذا باضافه رقم او كلمه cnsec ويفضل 90% |